Each Tracker tab, like "Untitled" above, displays the following components:
 or double-clicking its toolbar.

The order of the buttons on the main toolbar closely match the steps used to analyze a video. Buttons include (from left to right):
Buttons near the right end of the toolbar control documentation tools, memory status and data refresh:
![]()
Here a particle model track has been added and the split panes have been opened to display all view types and their toolbars.

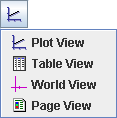
Except for the main video view, any view pane can display any type of view. To select a desired view type, click the view chooser button at the left end of a view toolbar and choose from the drop-down list.
Tracker projects (TRZ) may contain support documents such as instructions, reports, etc. that are not displayed in Tracker itself but instead in a separate desktop application. These documents are called support files.
All support files are opened on the desktop when the Tracker project is opened. HTML files are displayed in the user's default web browser and PDF files in the user's default PDF viewer.
A Documents button 
![]() is displayed on the toolbar whenever support files or page view HTML files are available for viewing on the desktop. To open (or re-open) a file, click the Documents button and choose the name of the document from the popup list.
is displayed on the toolbar whenever support files or page view HTML files are available for viewing on the desktop. To open (or re-open) a file, click the Documents button and choose the name of the document from the popup list.
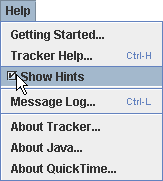
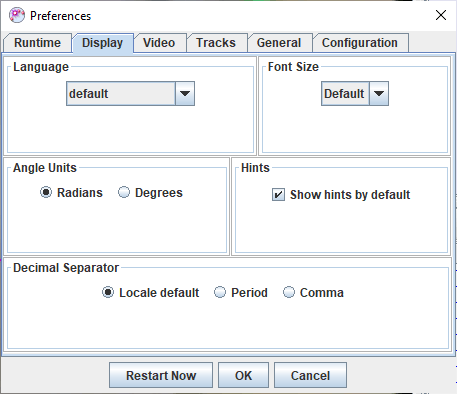
By default, Tracker displays hints in a yellow box at the bottom right corner of the main view. Hints are very useful for new and occasional users of Tracker. Experienced users can turn off hints by unchecking the Show Hints checkbox in the Help menu or in the Display tab of the preferences dialog.
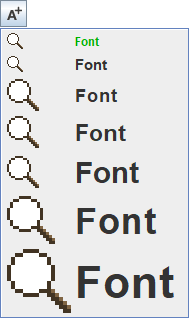
The Font Size determines the size of both fonts and icons. In most cases, the default font size is best, but larger fonts are often useful when making a presentation or using a high screen resolution. To change the font size click the Edit|Font Size menu and choose the desired size from the popup menu. The current size is shown in green. You can also set a preferred font size in the Display tab of the preferences dialog.
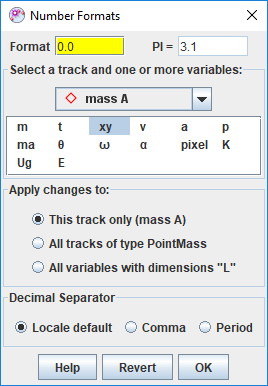
Real numbers displayed on the toolbar or in datatables may be formatted using either decimal or scientific notation. For scientific notation, the letter E is used to mean "times 10 to the power of" so the number 1.3 x 10^3 is written 1.3E3. By default, the choice of decimal or scientific notation and number of decimal places varies based on the magnitude of the number.
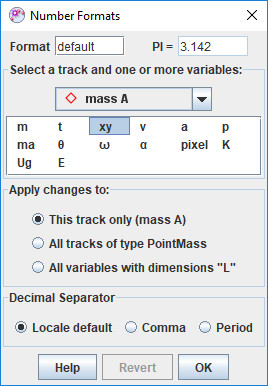
It is often desirable to set a fixed format for some variables in order to make reading and comparing values easier. You can do this using the Number Formats dialog.
To open the Number Format dialog right-click a text field or datatable and select Numbers|Formats... from the popup menu. In the dialog, select the track and names of the variables you wish to format. Use the shift and control keys to add or remove names from the selection. Enter the desired format into the format field to apply it to the selected variables. The sample field shows the result of the format applied to the number PI. Changes are also seen immediately wherever the variables are displayed.
To apply format pattern changes to all tracks of the same type, select All tracks of type X.
To apply changes to all variables with the same dimensions, select All variables with dimensions "X". This is a very fast way to apply the same pattern to all length and position variables in all tracks (dimension "L"), for example.
The decimal separator character is normally locale-dependent. For example, a period is used in the US and a comma is used in Europe. However, you can override the locale default by selecting period or comma at the bottom of the Number Formats dialog. You can also set a preferred decimal separator in the Display tab of the Tracker Preferences.
![]()
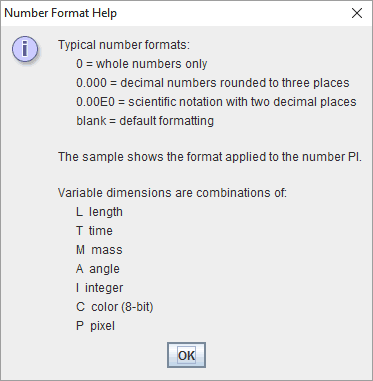
Click the Help button to display sample formats and dimension definitions.
The background mat is a white area normally hidden behind the video. It is never smaller than the video, but may be made larger if desired by choosing from the Edit|Mat Size menu. A larger mat size increases the area that is drawn in the video and world views. This is useful when some of a track's steps, or the axes, would otherwise be drawn offscreen--a common situation when using particle model tracks, calibration point pairs or offset origins.
Select a language other than that of the default locale by choosing from the Edit|Language menu or in the Display tab of the preferences dialog.
If your preferred language is not available, and you wish to provide a translation, please contact Douglas Brown at dobrown at cabrillo dot edu.
Most operations in Tracker can be undone and redone using the Undo and Redo items in the Edit menu. There is no limit to the number of undo actions.
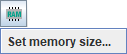
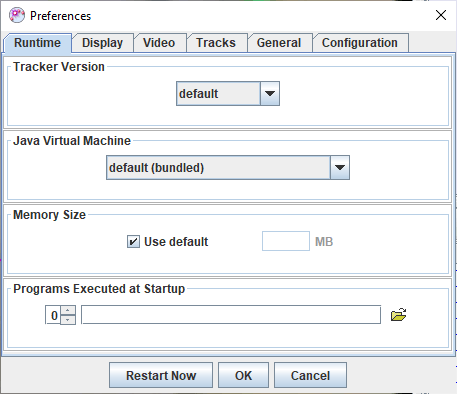
By default Tracker has at least 64MB of memory available (machine-dependent), enough to handle most moderate-sized videos. But when analyzing large or multiple videos, or long image sequences, additional memory will likely be needed. The memory manager button near the right end of the toolbar displays information about the current memory status in the tooltip when you hover over it with the mouse. The button icon turns red when the current memory limit is approached.
To increase the memory available to Tracker, click the memory manager button and select Select memory size.
The preferences dialog enables a user to set the configuration and other properties of Tracker. These preferences are saved in a ".tracker.prefs" file that is automatically read every time Tracker starts. To display the preferences dialog, choose the Edit|Preferences menu item or type control-enter (cmd-enter on Mac). To relaunch Tracker immediately with changed preferences, click the Relaunch Now button.
![]()
Set preferences in the following tabs: